How to ‘Publish’ a Web Application in Visual Studio 2003

3 08 2010

If you’ve used later versions of Visual Studio for creating web applications, you will know that there is an option to ‘Publish’ your application which allows you to compile your application into only files needed to run the application (a good practice to use when putting your application online).

When it comes to Visual Studio 2003, there isn’t such an option but the functionality is still there, just masquerading under a different menu option!

When you have your project open, build it in ‘Release’ mode (it is not essential that it is built in ‘Release’ mode but I find there are performance improvements over building it in ‘Debug’ mode). Now select ‘Copy Project’ from the ‘Project’ menu along the top.

CopyProjectMenu

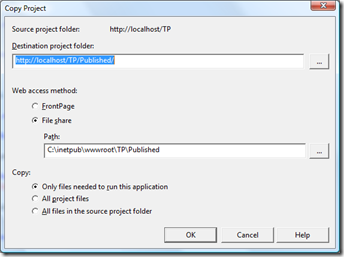
You will then be presented with the following pop-up dialog:

CopyProjectDialog

Here you give it a destination project folder (in my case, the same as the source project folder, but to a folder called ‘Published’), and a web access method. I choose to publish it to my local file system, and then upload it myself. You then choose to copy ‘Only files needed to run this application’ and click ‘OK’. If you now go to the folder which you chose in the ‘File Share’ path, you will have all the files you need to upload to put your web application online, the same as if you had ‘Published’ a web application in a later version of Visual Studio.


Adding Text to an Image

23 06 2010

I had a blank calendar icon that I needed to draw a date on to depending on the user that was signed in to my website. It took some fiddling, but eventually after a few errors and some searching, I have the solution. On my ASP.net page, I have 2 images: calenderIcon and blankCalenderIcon. Both of these have their ‘Visible’ attribute set to false. blankCalenderIcon is the image I always start with and that is never changed, and calenderIcon is the image that has been modified to include a date. The code snippets are originally broken up to allow me to explain easier what is going on and provide some relevant links. However there is a full code snippet at the end of the post without any explanations.

Firstly, as there is a crossover here between System.Drawing.Image and System.Web.UI.WebControls.Image, I had to save the image I had placed on my page as a System.Drawing.Image.

System.Drawing.Image img = null;
img = System.Drawing.Image.FromFile(Server.MapPath(blankCalenderIcon.ImageUrl));

Then in order to edit the image, and save it back to it’s original ‘ImageUrl’ path, you need to create 2 Bitmap objects. If you try and do all of this with one Bitmap object, you will get the following error, "A generic error occurred in GDI+". This is because the file is locked. For a more in depth explanation, click here.

Bitmap originalCalender = new Bitmap(img);
Bitmap newCalender = new Bitmap(originalCalender.Width, originalCalender.Height);
Graphics newG = Graphics.FromImage(newCalender);
newG.DrawImage(originalCalender,0,0);

Now that you have your Graphics object that contains the blank image, you can add the text to it. I personally set the Anti Aliasing for smoothness, that’s obviously not a necessity. I then use the DrawString method to place my text on the image. For some further info on how to do this and how it works, click here.

newG.TextRenderingHint = System.Drawing.Text.TextRenderingHint.AntiAlias;
StringFormat strFormat = new StringFormat();
strFormat.Alignment = StringAlignment.Center;
newG.DrawString("July 2011", new Font("Arial", 12), Brushes.White, new RectangleF(12,5,newCalender.Width, 30));

Now that your new image is ready, you need to dispose of your graphics object, your originalBitmap and in this case the Image object created to allow us to create the original Bitmap object (I say in this case because in a Windows Forms application, that step wouldn’t have been necessary).

newG.Dispose();
originalCalender.Dispose();
img.Dispose();

Now that everything has been disposed, you can save your new Bitmap object back to your original icons ‘ImageUrl’ and then in my case, make the icon visible.

newCalender.Save(Server.MapPath(calenderIcon.ImageUrl));
calenderIcon.Visible = true;

And now you will see your original Image, but with your text added. Magical!

System.Drawing.Image img = null;
img = System.Drawing.Image.FromFile(Server.MapPath(blankCalenderIcon.ImageUrl));
Bitmap originalCalender = new Bitmap(img);
Bitmap newCalender = new Bitmap(originalCalender.Width, originalCalender.Height);
Graphics newG = Graphics.FromImage(newCalender);
newG.DrawImage(originalCalender,0,0);
newG.TextRenderingHint = System.Drawing.Text.TextRenderingHint.AntiAlias;
StringFormat strFormat = new StringFormat();
strFormat.Alignment = StringAlignment.Center;
newG.DrawString("July 2011", new Font("Arial", 12), Brushes.White, new RectangleF(12,5,newCalender.Width, 30));
newG.Dispose();
originalCalender.Dispose();
img.Dispose();
newCalender.Save(Server.MapPath(calenderIcon.ImageUrl));
calenderIcon.Visible = true;



How to retrieve Connection Strings from a Web App config file

12 05 2010

A friend of mine who’s just starting out with a bit of C# and asp.NET asked me about this yesterday. He had spent the evening before doing lots of searching and hadn’t found anything that actually helped him get his connection string from his web.config file into the C#. So I thought I’d write a little post about it.

The common practice with connection strings in asp.NET is to put them in your web.config file. By doing this, when you need to change your connection string, for example when you put it on your web server, you can change it in one place in the config file and your web application doesn’t need to be changed or rebuilt in any way. As mentioned above, the problem my friend had was getting the connection string from the config file into the C# so here’s some code example to show how it’s done.

1. Put your connection string in your config file (www.connectionstrings.com is a great resource to help with formatting of connection strings and different types of connection strings for different servers). Please excuse the formatting of the XML below, it wouldn’t allow me to use the <> tag’s in the code box so this was a better way!

<connectionStrings>

<add name=”UsefulAppConnString” connectionString=”Data Source=myServerAddress;Initial Catalog=myDataBase;IntegratedSecurity=SSPI;”

</connectionStrings>

2. Add a reference to System.Configuration (right click ‘References > Add Reference’, select the .NET tab and find System.Configuration. Double click it or highlight it and click ‘OK’).

addref

3. Add a using statement to your C# class where you will be pulling in the connection string.

using System.Configuration;

4. Now you have everything you need to get the connection string! In this example I’m just going to put it in a string variable. You could assign it to a string variable when your web app loads that could then be accessed throughout your web application or you could just retrieve it from the config file every time you wanted to use it. That’s up to you.

string connString = ConfigurationManager.ConnectionStrings["UsefulAppConnString"].ToString();

You can also store the connection string in the appSettings part of a config file. If you do, you will need to use ConfigurationManager.AppSettings instead of ConfigurationManager.ConnectionStrings.

So the ConfigurationManager is effectively your config file. Using ConfigurationManager.ConnectionStrings is looking at the data within the ConnectionStrings tags in your config file. The name in the square brackets as you’ve probably noticed is the name attribute I assigned to my connection string in step 1.

So there it is. How to retrieve your connection string from your web.config file.


3D Pie Charts (in Web projects)

9 02 2010

I recently needed to create a 3D pie chart and save it to a file so I could use the image to save to a PDF. I found the following tutorial / code library (which you’ve probably found long before finding this) which is fantastic http://www.codeproject.com/KB/graphics/julijanpiechart.aspx

However this is created for Windows Forms, and I was using this class with a web project. In the comments, there is some code given by the author in order to be able to save the file. Perfect! Unfortunately not if you’re using it in a web project, as this code will only work in Windows forms.

So here is how I got around it…

I used the PieChart3D object, intended for printing, as this gave me the opportunity to create a Bitmap object and use it’s graphics properties to pass to the PieChart3D.Draw method. This in turn means that when you call the Draw method passing the Bitmap’s graphics properties, it will draw to the Bitmap object. The Bitmap object has a Save method that can be used to save the file either temporarily or permanently.

Here’s my code…

private void DrawPieChart(decimal[] values)
{
//Set the properties of the pie chart
PieChart3D pie = new PieChart3D(10, 10, 200, 100, values, 0.15F);
pie.Colors = new System.Drawing.Color[] { System.Drawing.Color.DarkSeaGreen, System.Drawing.Color.LemonChiffon, System.Drawing.Color.Orange };
pie.Texts = new string[] { String.Format("{0}%", values[0].ToString()), String.Format("{0}%", values[1].ToString()), String.Format("{0}%", values[2].ToString()) };
pie.SliceRelativeDisplacements = new float[] { 0,0,0 };
pie.InitialAngle = -30F;
pie.FitToBoundingRectangle = true;
pie.EdgeColorType = EdgeColorType.DarkerThanSurface;
pie.EdgeLineWidth = 1;
pie.ShadowStyle = ShadowStyle.GradualShadow;
//Save the pie chart to a bitmap
Rectangle bounds = new Rectangle((int)pie.X, (int)pie.Y, (int)pie.Width + 30, (int)pie.Height + 30);
Bitmap bitmap = new Bitmap(bounds.Width, bounds.Height);
Graphics grph = Graphics.FromImage(bitmap);
grph.CompositingQuality = System.Drawing.Drawing2D.CompositingQuality.HighQuality;
grph.InterpolationMode = System.Drawing.Drawing2D.InterpolationMode.High;
pie.Draw(grph);
pie.PlaceTexts(grph);
string tmpFilename = System.IO.Path.GetTempFileName();
bitmap.Save(tmpFilename);
}

So the second part of the code is what we’re concentrating on here. Firstly you create a bounding rectangle using the X & Y position and width and height of the pie chart. Using this rectangle, you can create a Bitmap that will be the correct size for your pie chart. You can then create Graphics from the Bitmap using the static Graphics method FromImage, passing in the Bitmap you have created. You then set the CompositingQuality and InterpolationMode (I don’t think this is absolutely necessary, however it is done in the original example, and I think it’s worth doing to get a high quality pie chart in your Bitmap). Using the Graphics you have just created from the Bitmap, you can now call the Draw method for the PieChart3D object, passing in these graphics (I also call place texts so it will show the percentages on each pie slice). For my use, I only needed a temporary file save (as I was then putting the file into a PDF and saving that). You could build a permanent file name if required instead of using GetTempFileName. Then you can call your Bitmap objects Save method and there you have it. Your pie chart, saved into a Bitmap from a Web Form project.


Are you sure you want to do that? Pop-up boxes with ASP.net web applications.

29 01 2009

My current project required that when a user tried to delete something, they would get a warning, that deleting that would delete other things to and offer them the option to proceed or cancel. There are many ways to do this, the best way I found to do it was using the following code:

Response.Write("<script>var result=confirm('Are you sure you want to delete this project? Doing so will also delete all units and tests associated to this project. Click OK to proceed, or Cancel to return to the Project Maintenance screen.');if(result){window.document.location.href='SubmitProject.aspx';}else{window.document.location.href='ProjectMaintenance.aspx';}</script>");

So the Javascript function says:

show the confirmation box
if(result == 'Ok')
{
go to SubmitProject.aspx
}else{
return to current page ProjectMaintenance.aspx
}

This is a very hand bit of code that I will probably use quite a lot from now on!